Home treatment of frozen shoulder syndrome
Frozen shoulder syndrome, medically called periarthritis humeroscapularis, is a severe form of chronic inflammatory disease of the shoulder and surrounding soft tissues. The inflamed connective tissues thicken, growing from the normal 3–4 mm to even 1–2 cm. They become stiff and restricted, which impairs joint movement. Because you cannot move your arm properly, the joint becomes progressively stiffer and, over time, the soft tissues begin to scar and the shoulder “freezes.” This is a vicious circle that can only be broken with anti-inflammatory treatment.

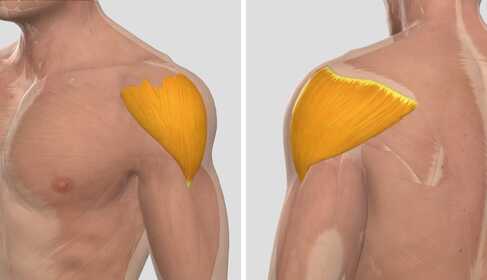
The shoulder joint
The shoulder joint (art. humeroscapularis) is one of the most complex joints of the body. Tendons, ligaments and muscles connect the upper arm bone to the shoulder blade and through it to the trunk. The joint’s design allows you to move your arm in a wide range of directions. The joint is surrounded by a capsule and ligaments. Its stability is provided by a group of muscles called the rotator cuff, which keep your arm in place.

Right: the rotator cuff muscles ensure the joint’s stability and movements
Symptoms of frozen shoulder
The most characteristic symptom is pain appearing in the front and side of the shoulder and the resulting restriction of movement. It is worse in the morning. After being still during the night, the shoulder "starts up" with difficulty. Over time the pain may occur at rest and intensify with movement.
The range of motion of the shoulder joint gradually decreases. Initially external rotation, then lifting the arm to the side becomes painful. You cannot raise your arm above your head, and you may only be able to lift it minimally. The joint can become so stiff that even passive movement is limited. A physiotherapist may also struggle to move it into these directions.
Prepare for a prolonged recovery process!
Even with regular treatment the recovery process is slow; it may take one and a half to two years for your shoulder to regain all its functions. A painful shoulder severely affects your daily life and limits work and everyday activities for a long time. Your quality of life deteriorates and it can be psychologically burdensome!
Frozen shoulder – what can you do at home?
Since the cause of the complaints is inflammation, any anti-inflammatory method can help. If possible, combine several methods! Read why this is beneficial.
The sooner you start treatments, the better! So if you have shoulder pain, do not wait—see a doctor as soon as possible!
Medical treatment of frozen shoulder syndrome is usually conservative.
- you will receive anti-inflammatory and pain relief medications or injections
- physiotherapy (exercise therapy) is recommended
- you will receive various physiotherapy treatments, which can include softlaser, therapeutic ultrasound, magnetotherapy and electrotherapy in combination.
It is important to know that a few prescribed sessions are not enough for either physiotherapy or electrotherapy!
Learn the exercise movements and perform them diligently at home—several times a day, even 3–4 times! You can continue physiotherapy-type treatments at home as well.
Shoulder Rope – to regain range of motion
Get the Shoulder Rope device. For frozen shoulder and rotator cuff problems I particularly recommend this easy-to-use, simple tool. You can effectively improve the shoulder’s range of motion and at the same time help strengthen the rotator cuff muscles and other shoulder muscles. This is important for regaining full shoulder mobility.
You can see a few exercises here.


Regaining shoulder range of motion is a lengthy struggle whose success largely depends on you. If you practice regularly (several times daily), you will speed up rehabilitation and the return to your original condition.
Home electrotherapy
Softlaser, magnetotherapy, microcurrent, muscle stimulation, ultrasound and deep heat therapy each help the inflammation heal in different ways, so they can reinforce each other’s effects.
In this article I describe microcurrent and muscle stimulation treatments. These treatments are provided by the following devices. Choose from these:
Electrotherapy requires time investment! It can be performed 2–3 times a day. You can even treat yourself at work, in the office, because the sticky electrodes can be hidden under clothing and the devices fit in a pocket.
Read my articles about the effects of microcurrent. In short: cells in inflammation stop producing energy, so they do not generate enough substances that aid healing. Microcurrent can increase cellular energy production up to eightfold, which kickstarts their function.
With muscle stimulation there are two goals. First, it directly helps relieve muscle stiffness; second, the treatment improves muscle blood circulation, i.e., it speeds delivery of healing substances and removal of metabolites.
Preparations for microcurrent treatment
- For the treatment you will need 2 gray microcurrent cables and 4 electrodes. Take these out!
- I recommend square electrodes sized 50×50 mm (the size may differ by a few millimeters).
- One end of the cables splits into two and ends in pin-like metal connectors. You use these to connect to the self-adhesive tens electrodes.
- Connect the cable ends and the electrodes!
- The other end of the cables has a connector that you can plug into the device. Connect them to the device!
- Attention! For the devices listed, microcurrent treatment is provided only by channels 1 and 3 counting from the left. So you must plug the cable ends into these channels.
Electrode positions for microcurrent treatment
- For treatment you must remove the self-adhesive electrodes from their plastic backing and stick them onto your shoulder.
- It is best if you first wash the skin with warm, soapy water and dry it.
- The oilier or sweatier your skin is, the shorter the lifetime of the same electrode.
- Grab the gray cable connected to Output 1 and stick its two electrodes on as shown in the illustration.
- Stick the electrodes for Output 3 according to the illustration.
- Attention! For microcurrent treatment you must connect the electrode pairs crosswise!

Electrode placement for muscle stimulation treatment
- For unilateral shoulder treatment you will need 2 colored cables (any colors) and 4 electrodes. Take these out!
- I recommend square electrodes sized 50×50 mm (the size may differ by a few millimeters).
- Alternative: 1 colored cable and 2 rectangular electrodes sized 50×90 mm. The latter can also be suitable.
- One end of the cables splits into two and ends in pin-like metal connectors. You use these to connect to the self-adhesive tens electrodes.
- Connect the cable ends and the electrodes!
- The other end of the cables has a connector that you can plug into the device. Connect them to the device!
- It does not matter which colored cable you plug into which connector on the device. Each channel provides the same treatment. The colors are only to help you identify the cable ends.

On your Activa 700, Premium 400, Genesy 300 Pro or Triathlon Pro device find the appropriate program and treat accordingly.
- Location of microcurrent programs (MCR) in the menu: Program list / Medical Treatments / Microcurrent /
- Location of muscle stimulation programs (EMS) in the menu: Program List / Sport
| Weeks 1–4 | Mon | Tue | Wed | Thu | Fri | Sat | Sun |
| Shoulder-scapular periarthritis (20 min) – MCR | X | X | X | X | X | X | X |
| Rotator cuff inflammation (20 min) – MCR | X | X | X | X | X | X | X |
| Stiffness relief* / Upper limbs (20 min) – EMS | X | X | X | X | X | X | X |
| From week 5 until recovery | Mon | Tue | Wed | Thu | Fri | Sat | Sun |
| Rotator cuff inflammation (20 min) – MCR | 2X | 2X | 2X | 2X | 2X | 2X | 2X |
| Stiffness relief* / Upper limbs (20 min) – EMS | X | X | X | X | |||
| Capillarization / Upper limbs (20 min) – EMS | X | X | X |
The Genesy 300 Pro device does not have a stiffness relief program. If you have this device, use the Capillarization or Warm-up programs instead.
Setting intensity
FOR MICROCURRENT TREATMENTS
- When you press the "Start" button to launch the microcurrent program, the treatment has not started yet!
- For microcurrent programs you must press the "P+" button once to begin.
- You cannot change the intensity while the microcurrent treatment is running (and you do not need to)!
- Most people do not feel the microcurrent—the current strength is one millionth of an ampere, i.e., extremely mild.
FOR MUSCLE STIMULATION TREATMENTS
- When you press the "Start" button to launch a muscle stimulation program, the treatment has not started yet!
- You must set the treatment intensity. Use the "P+" and UP arrow buttons to increase intensity and "P-" and DOWN arrow buttons to decrease it.
- Everyone experiences the current differently and reacts differently. Therefore the device does not set a value automatically; you must provide it.
- If you raise the intensity step by step, you will feel fine twitches in your muscles.
- The higher the intensity, the stronger the contractions and the stronger the effect.
- Beyond a certain value the treatment becomes painful. If so, reduce the intensity by a few mA!
- During the treatment you should feel definite contractions, but it should not be painful!
- Stimulate at the upper level of your comfort zone.
- If you do not provide enough intensity and there are no contractions, there is no effect.
Finishing
- When the treatment time expires, the program ends.
- Turn off the device.
- Remove the electrodes one by one carefully from your skin (not by pulling the cable) and immediately place them back on the plastic backing.
- Many people have reported that storing electrodes in a normal refrigerator extends the adhesive’s lifespan. I'll leave that up to you! 🙂
My recommendation
It is not the electric current itself that heals the inflammation, but the processes it triggers in your body! The treatments strengthen and stimulate your body’s natural healing processes.
This does not happen in one day. You should not expect miracles from a single treatment! You may feel the first encouraging signs around 15–20 days: pain diminishes and movement becomes a bit easier. But you are not "done" yet at that point.
Continue treatments and Shoulder Rope physiotherapy until full recovery. Be prepared for a long process that may last several months! Success depends primarily on you.