Thigh muscle strengthening with a muscle stimulator
Strengthening the thigh muscles may be necessary for many reasons. Reversing muscle mass loss after a prolonged illness or fracture, treating muscle atrophy, and increasing the stability of the knee and hip joints are the most common reasons. In this article you'll find a generally applicable, 3-month program that helps strengthen your thigh muscles without increasing pain or risking surgery. I explained in earlier articles why this is effective, so here I will focus only on outlining the treatment steps.

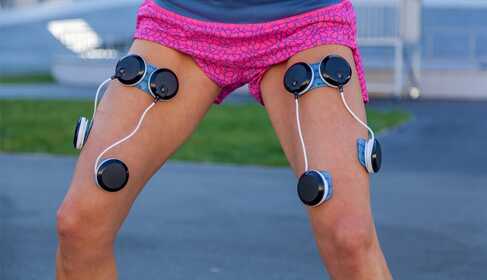
In this article I demonstrate how to strengthen the front thigh muscles (also called quadriceps). To keep the treatment from taking hours, use a 4 channels muscle stimulation device. With this the daily treatment time will be 30–40 minutes. If you have a 2 channels device, you'll need at least twice as much time, because it can treat only one thigh at a time and then you must treat the other side separately.
Important!
It is important to understand the following
- Muscle strengthening is most effectively achieved through exercise.
- If your condition is severe — for example you are so weak that you cannot even perform exercises, or your pain prevents movement — muscle stimulation is the only method that can help improve your muscle condition and restore strength.
- If you are able to move independently, the muscle stimulator is meant to complement and make physiotherapy/exercise more effective, significantly shortening recovery time.
- For regaining strength, physiotherapy and then gradually increasing movement are primary. A physiotherapist, movement therapist or medical fitness trainer can teach you the exercises appropriate for your current condition, and then you can perform them yourself anytime.
- Muscle strengthening does not happen in a day (neither with exercises nor with a device). You cannot expect meaningful change from a single treatment — at best you may get muscle soreness.
- Both exercise and using a muscle stimulator require gradual progression. In the first week the muscles must be accustomed to contractions; from the second week you will receive more frequent and stronger treatments, and after that the strengthening phase begins.
- You can expect the first signs of improving muscle condition after two to three weeks; by then you will feel that your muscles support you better and you feel better. But you are not yet “ready.”
- After the second month you should perform increasingly stronger and more intense exercises.
- After the third month exercise (i.e., physical activity) should be primary and stimulation is recommended as a supplement.
- If you reach improvement, you must not stop! Without exercise or stimulation the gained muscle strength will decline again within a few weeks. Regular physical activity is needed to maintain strength.
Devices to assist thigh muscle strengthening
You will need a muscle stimulation device. Choose from among these:
MyoBravo, Premium 400, Genesy 300 Pro, Elite 150, Cycling Pro, Runner Pro, Triathlon Pro, Soccer Pro, The Champion
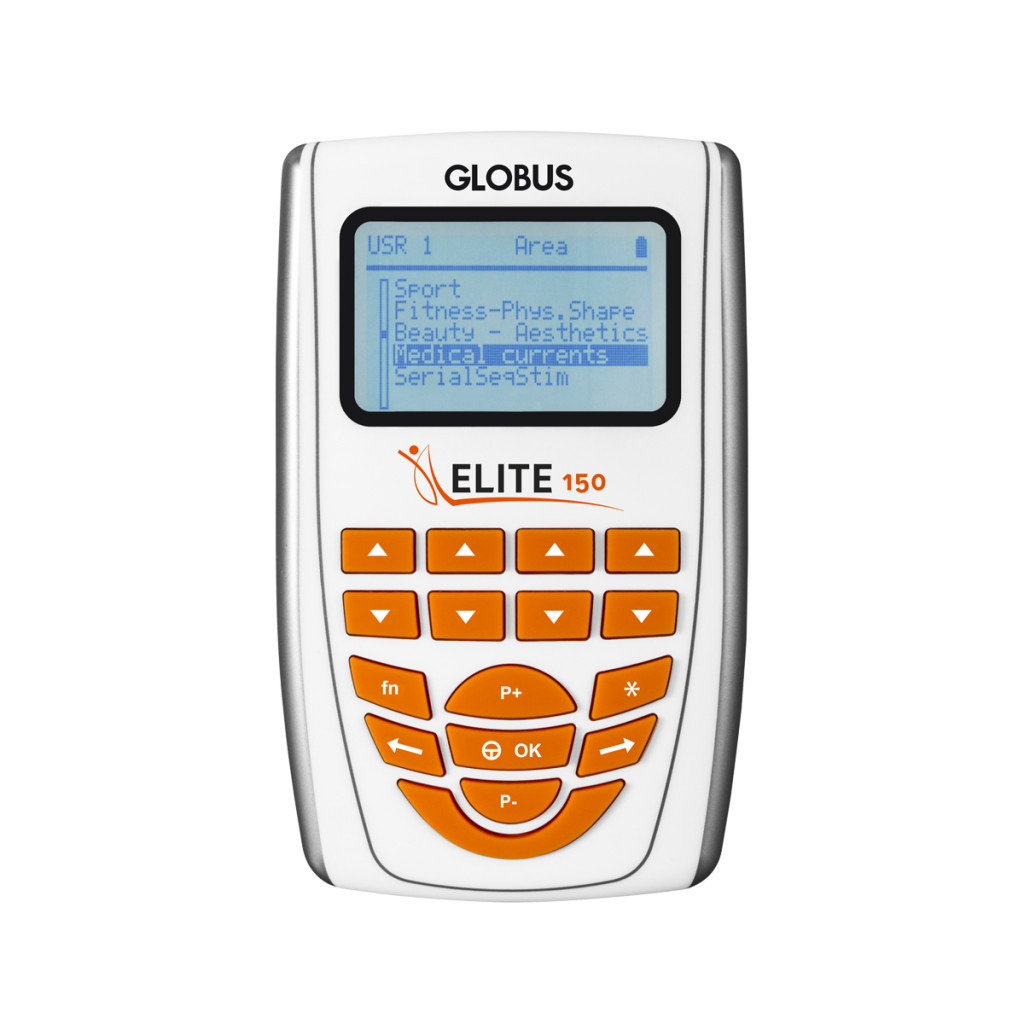
Elite 150 muscle stimulation device, 4 channels
Elite 150 muscle stimulation device with TENS and EMS treatments, programs to support muscle development and regeneration.
Preparations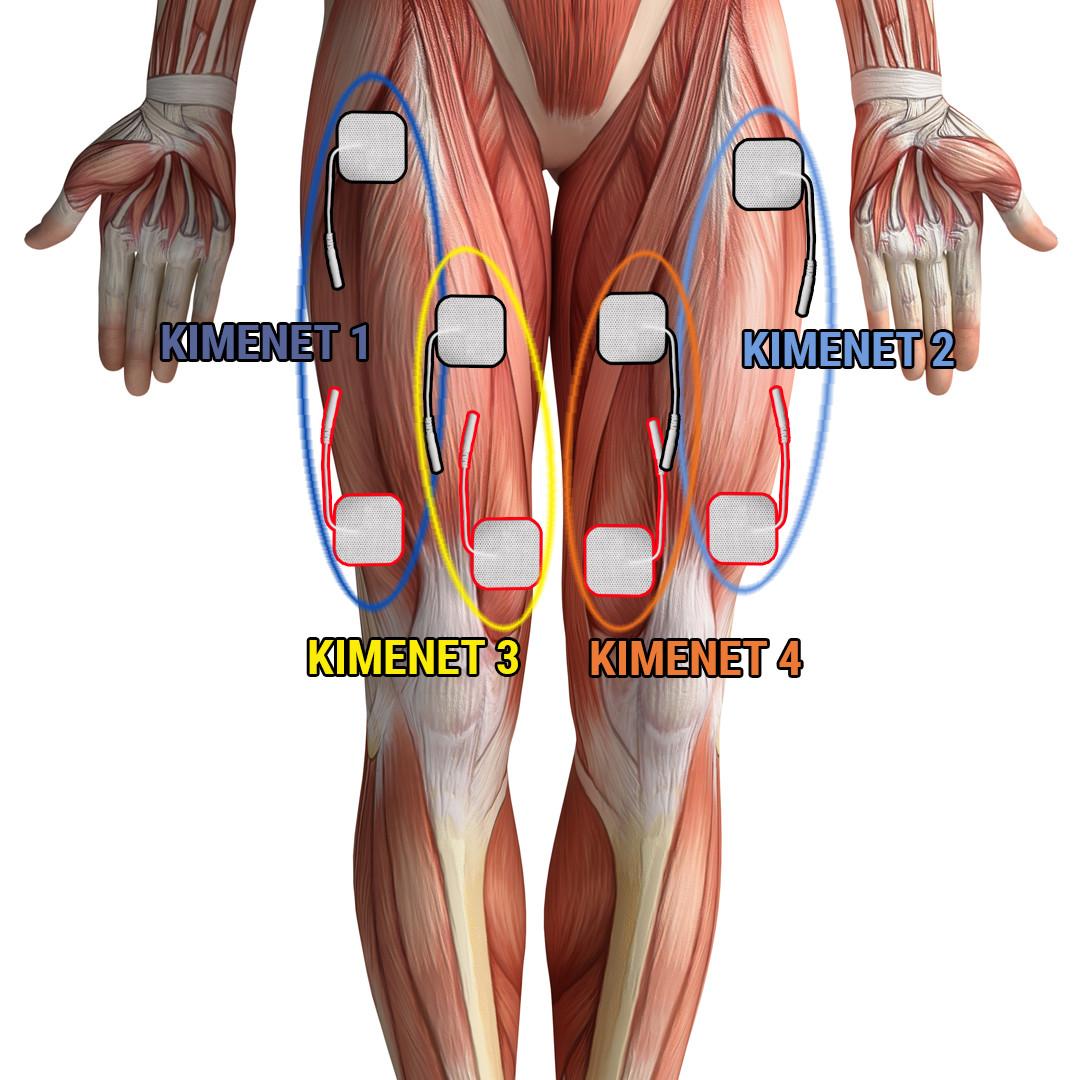
- Take out your device, plus 4 cables and 8 self-adhesive electrodes (TENS pads)!
- I recommend square electrodes sized 5×5 cm (the size may vary by a few millimetres) – the ValueTrode and ValueTrode X, UltraStim and PALS electrodes are all suitable.
- One end of the cables splits into two and terminates in pin-like metal connectors. A self-adhesive TENS electrode must be connected to each of these.
- Connect the other end of the cables to the device.
- Cables may be different colours. It doesn't matter which colour cable you plug into which connector on the device. The colours are just to help you easily identify the two ends of a cable.
- The two electrodes belonging to the same-coloured cable must be on the same muscle (or muscle group). The treatment current flows between the two electrodes and this will trigger the contraction. IT IS NOT GOOD if the two electrodes are not on the same muscle, or if they are more than a few centimetres apart.
Electrode placement points
- For thigh muscle strengthening treatments, peel the self-adhesive electrodes off their plastic backing and stick them to the skin.
- I recommend washing the treatment area with lukewarm, soapy water before treatment and drying it thoroughly.
- Oily, sweaty or dusty skin worsens the electrode adhesive and you will only be able to use the same electrode for a short time.
- Stick the two electrodes that connect to Output 1 one under the other as shown in the illustration.
- Then stick the electrodes for Outputs 2–3–4 in sequence as shown in the illustration.
Thigh muscle strengthening training plan
If you have finished placing the electrodes, switch on the device and select the treatment program from the menu.
If you have an Elite, Elite 150, Cycling Pro, Runner Pro, Triathlon Pro, Soccer Pro, Moto Pro, Premium 400, Activa 700, The Champion, Genesy 600, Genesy 1500 or Genesy 3000 device, follow the instructions below.
The mentioned programs are found under Program list / Sport program group. In all cases choose the Lower limbs muscle group!
Week 1
| Program | Mon | Tue | Wed | Thu | Fri | Sat | Sun |
|---|---|---|---|---|---|---|---|
| Stiffness relief (20 minutes) | X | X | X | X | X | X | X |
| Endurance strength (25 minutes) | X | X | X | X |
Weeks 2 – 3
| Program | Mon | Tue | Wed | Thu | Fri | Sat | Sun |
|---|---|---|---|---|---|---|---|
| Endurance strength (40 minutes) | X | X | X | X | X | X | X |
| Maximum effort (30 minutes) | X | X |
Weeks 4 – 12
| Program | Mon | Tue | Wed | Thu | Fri | Sat | Sun |
|---|---|---|---|---|---|---|---|
| Endurance strength (50–60 minutes) | X | X | X | X | X | X | X |
| Maximum effort (30–40 minutes) | X | X | X |
If you have a MyoBravo device, you must choose program numbers instead of program names. You can find details in the user manual.
- Stiffness relief = Program 23,
- Endurance strength week 1 = Program 02,
- Endurance strength from week 2 = Program 03,
- Maximum effort weeks 1–3 = Program 08,
- Maximum effort from week 3 = Program 09.
Setting the intensity
- When you start the treatment program, you will not feel anything yet. At this point no treatment is taking place.
- To make something happen you must increase the current intensity. Everyone feels current differently and reacts differently. You will feel it differently even on different days. That's why the device does not set a value by itself. You must find the right value yourself.
- Increase the intensity slowly. Each button press increases the intensity by 1 mA.
- Soon you will feel twitches in the muscle. These are not yet strong enough, so you should increase the intensity further.
- The higher the intensity, the stronger the contraction you will experience and the greater the effect.
- Beyond a certain (individual) value the treatment becomes painful. At that point reduce the intensity by a few mA!
- During the treatment you should feel very definite contractions, but this does not have to be painful!
- Stimulate at the upper end of your comfort zone. The appropriate range is usually between 18–40 mA.
- For 5×5 cm electrodes the maximum intensity should not exceed 50 mA.
- If you do not give enough intensity there will be no contractions and no effect.
Finishing up
- When the treatment time ends, the program finishes.
- Turn off the device.
- Peel the electrodes off the skin one by one carefully (do not pull at the cable) and immediately put them back on the plastic backing.
- Many have reported that storing the electrodes in a normal refrigerator increases the adhesive lifetime. I leave that up to you! 🙂